Blog post
This is a guest post contributed by Cloudinary, a cloud-based service that provides an end-to-end image and video management solution including uploads, storage, administration, manipulation, and delivery. Learn more about their PHP image upload capabilities here.
Uploading images, especially at scale, is completely inefficient if you choose to do it manually. Businesses deal with lots of images on their websites, especially ecommerce companies, and it makes sense to attempt to automate the process of uploading the pictures you want to use. Small websites with few images are fine for uploading by hand, but you’ll want to consider implementing a coding structure for larger scale image uploads.
Image upload and website performance are inextricably linked. The practices you follow when uploading images can have direct consequences for how quickly (or slowly) the pages on your website load for users. Over 50 percent of a standard modern web page is comprised of images, and many websites ruin their performance by uploading images larger than they need to be or in the wrong format.
There are several options for automating the process of uploading images to make it easier, including PHP image upload, in which a developer creates code that allows you to simply add many images at a time to a form, which executes a PHP script to automatically add the images to your site.
Just because your site uses code to make uploading images more efficient, that doesn’t mean the images are always going to be managed optimally. The following five best practices highlight some of the most useful tips and tricks you should consider using when handling and uploading lots of images to your website. By implementing these best practices you can save time and ensure optimum website performance.
Use Content Delivery Networks
Hosting images on the same server you use for your website is a terribly inefficient way to deliver images to your website’s visitors. Uploading all images to the same server that’s used to run your website puts a huge strain on the server, which ends up slowing down your load times. The end result of slow load times on your site is reduced traffic and thus lower sales.
One of the best things you can do to manage your images is to upload them for hosting on a content delivery network (CDN). A CDN is essentially a globally distributed network of servers. When someone browses your site, the CDN routes the user to the server nearest to their location, which dramatically improves the performance of your pages by speeding up the image delivery to the end user.
Add Fingerprints to Image URLs
Image caching stores a local copy of the images on your site on visitors’ web browsers, which negates the need to download the images again on subsequent visits. Many webmasters take a cautious approach to image caching out of fear that if they update their images, users might get served old images instead of the updated ones.
To overcome this potential issue, you can get your developer to automatically add the MD5 hash of all uploaded images to their URLs, as they are uploaded. The MD5 is essentially an image’s fingerprint. When an image changes, so does the MD5 and thus the URL of the image, which means that each time you update your images, the browser is forced to grab the new image.
By taking this small step, you can set your image cache to expire in the very distant future, meaning a huge improvement in user experience because their browsers won’t need to retrieve images at each visit, meaning faster loading times.
Upload Using the Right Image Formats
Different image formats serve entirely different purposes on your site—uploading images using the wrong format is almost guaranteed to worsen the user experience. Neglecting to pay attention to image formats before upload also adds unnecessary bandwidth, which wastes your money.
The main thing to note is that you should never upload PNGs as photographs. There is typically no perceivable difference in quality between a JPEG photo and a PNG photo, but the latter format tends to result in images with huge file sizes that waste a lot of bandwidth. Only ever use PNGs for logos, charts, or when you need transparency.
Website loading speed improves when you only choose suitable formats for all uploaded images. Always remember that each image that is larger than necessary increases page loading times.
Experiment with Image Quality Standards
While serving crystal clear images to website visitors is important, you should still experiment with uploading images at lower quality levels, especially JPEG images. There is often little visual difference between a JPEG at 95% quality versus 75%, but the former file will always be a lot larger than the latter.
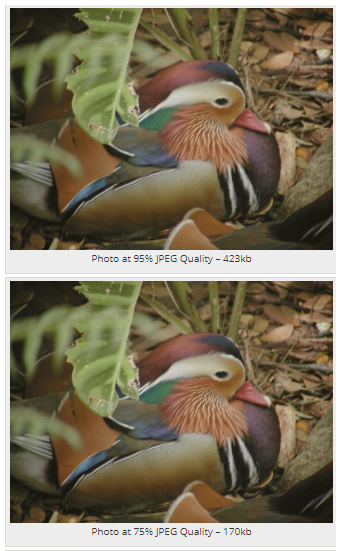
Source: Batch Image
Serving images at too high of a quality level can achieve the opposite effect from what you intend. Instead of improving the user experience, your site slows down because high-quality images reduce bandwidth. A slight reduction in uploaded image quality is often worth the benefit of improved website performance.
Secure Your PHP Upload Scripts
Incorporating PHP image upload on your site or application is a useful way to upload lots of images programmatically, but you need to be careful of security threats. Some of the best ways to improve PHP image upload security are:
- Only allow extensions jpg, jpeg, gif, and png to be uploaded.
- Set a maximum file size for PHP image upload.
- Check for uploaded file sizes that are too small because this can also be a sign of a cyber attack.
- Use a ready-made secure PHP upload script, such as this one on Github.
Setting a maximum file size also ensures you don’t unintentionally upload any large images that can compromise website performance. For example, a page with an image 25 MB in size would take nearly a minute to download to a user’s phone on a 3G connection (average speed 4.3 Mbps).
Compress Before Upload
Several online services, both free and paid, can compress your images before you upload them. Image compression reduces image file sizes, meaning images take less time to load, thus improving your website’s performance.
Lossless image compression reduces file size without any loss in quality, while lossy compression compromises quality. Choosing the right compression method before uploading means identifying what is more important: a larger reduction in image size and faster site loading speeds from lossy compression, or a slight improvement in website performance with no reduction in image quality from lossless compression.
Specify Image Dimensions Upon Upload
Uploading images without specifying their dimensions causes a strain on website performance because your visitors’ web browsers must work to display each page based on unknown image dimensions. Each image download with unknown dimensions adds time to page load speed because the browser must determine how to shape the page around every single image.
Simply add the dimensions of your images to your image tags upon upload, and you can tell all visiting browsers the exact dimensions, without requiring those browsers to figure out how to display your web pages. The end result of simply telling the browser the size of the images on your site is better website performance. For example:
<img src=”image.jpg” width=”200” height=”200” />
To conclude, you can better manage your uploaded images when you:
- Use a content delivery network to serve images instead of uploading them to the same server as your site.
- Add fingerprints to image URLs on upload to take advantage of less cautious image caching settings.
- Always upload images with the right format.
- Lower your image quality standards on upload to reduce bandwidth.
- Adequately secure your PHP upload scripts.
Summary
This is some text inside of a div block.


